SiteSorted
Demolition · United Kingdom

Method statement for soft strip

You must assess the risks of soft strip and record the significant findings if you employ 5 or more people. On CDM sites the principal contractor will ask for RAMS before you start.

RAMS cover the hazards, who could be harmed and how, the controls and the safe sequence of work, and the crew is briefed and signs. The main hazards are silica dust from concrete, brick, stone and tiles, disturbing asbestos, electric shock from live wiring and lead paint dust and fumes.

RAMS example: soft strip

This is a complete RAMS for soft strip, with 9 job steps. Open it in the builder to add your site, crew and signatures, change anything, and download a PDF. Or download the free Word template below and fill it in by hand.

Risk Assessment and Method Statement (RAMS)
Internal strip-out · Demolition · Example
Document RAMS-001 · Rev 1

Risk assessment

#ActivityHazardsWho might be harmedRisk beforeControlsRisk after
1Check the refurbishment and demolition asbestos survey and have any asbestos removed first, by an HSE licensed asbestos contractor where the work is licensable
  • Disturbing asbestos
Workers, Occupants, PublicVery high (15)
  • Before work on any building built before 2000, check the refurbishment and demolition asbestos survey for the work area (HSE HSG264). If there is none, presume asbestos is present or have it sampled before you start. Eliminate
  • Seal off the work area and keep everyone else out. Isolate
  • If asbestos must be disturbed, keep it wet, use hand tools not power tools, and clean up with an H-class vacuum. Control (engineering)
  • Most asbestos insulation, coatings and insulating board need a licensed contractor. Notifiable non-licensed work is notified to HSE before it starts. Other work needs trained workers and controls. Control (procedures)
  • Stop work straight away if you find suspect asbestos. Do not touch it and tell your supervisor. Control (procedures)
  • Wear a fit-tested FFP3 mask (or better) and disposable type 5 coveralls. PPE
Medium (5)
2Check for lead paint and other hazardous materials before work starts
  • Lead paint dust and fumes
  • Hazardous chemicals
Workers, Residents, Children, OccupantsHigh (12)
  • Test old paint for lead before you sand, scrape, cut or heat it. Eliminate
  • Use wet scraping, chemical strippers or shrouded tools with extraction instead of dry sanding. Never burn off lead paint with an open flame. Reduce / substitute
  • Seal off the work area with plastic sheeting and keep residents, children and pets out. Isolate
  • Clean up with an H-class vacuum and wet wipes. Never dry sweep. Control (engineering)
  • Wash hands and face before eating, drinking or smoking. Change out of dusty clothes before going home. Control (procedures)
  • Wear an FFP3 mask, disposable coveralls and gloves. PPE
  • Choose the least harmful product that does the job, for example water-based instead of solvent-based. Reduce / substitute
  • Use chemicals in well-ventilated areas, or use fans and extraction in closed rooms. Control (engineering)
  • Do a COSHH assessment and read the Safety Data Sheet (SDS) before use. Control (procedures)
  • Keep chemicals in labelled containers. Never decant into drink bottles. Control (procedures)
  • Store chemicals away from heat, food and drink, and keep products that react with each other apart. Control (procedures)
  • Have eye wash and a spill kit nearby, and wash hands before eating. Control (procedures)
  • Wear chemical-resistant gloves and safety glasses or goggles as listed on the SDS. PPE
  • Use a respirator with the right cartridge if the SDS calls for one. PPE
Medium (6)
3Isolate and cap power, gas and water to the area, and confirm they are dead
  • Electric shock from live wiring
  • Gas and fuel lines
Workers, Occupants, PublicVery high (15)
  • Isolate the power before any work. Do not work live. Eliminate
  • Lock out and tag the isolation point with your own personal lock and danger tag. Isolate
  • Prove dead at the point of work with an approved voltage indicator (GS38), and prove the tester before and after. Control (engineering)
  • Only competent, qualified electricians do electrical work, following a safe isolation procedure. Control (procedures)
  • Check for back feeds from solar, batteries and generators that can keep a circuit live after the main switch is off. Control (procedures)
  • If live work cannot be avoided, use a permit, a safety observer and insulated tools. Control (procedures)
  • Wear insulated gloves, arc-rated clothing and a face shield when testing or working near live parts. PPE
  • Isolate and purge the line before work, with the owner's approval. Eliminate
  • Lock off and tag the isolation valve. Isolate
  • Check for leaks with a gas detector before and during work, and ventilate the area. Control (engineering)
  • Only Gas Safe registered engineers work on gas fittings. Control (procedures)
  • Remove ignition sources: no smoking, no hot work and no sparking tools near the line. Control (procedures)
  • Know where the shut-off valve is and what to do if a leak happens. Control (procedures)
  • Wear safety glasses and gloves, and keep a fire extinguisher close by. PPE
Medium (5)
4Seal the area from occupants, set up dust control and keep exits clear
  • Working in an occupied home or building
  • General dust
  • Fire and emergencies
Residents, Children, Staff, Workers, Occupants, VisitorsHigh (10)
  • Plan noisy, dusty or risky work for when the building is empty. Eliminate
  • Close off the work area with barriers, plastic sheeting or locked doors, and put up signs. Isolate
  • Keep fire exits and paths clear at all times. Control (procedures)
  • Tell occupants before you turn off power, water or gas, and before noisy or dusty work. Control (procedures)
  • Lock away tools, chemicals and materials each day, out of reach of children. Control (procedures)
  • Use low-dust products, such as dust-reduced or pre-mixed compounds. Reduce / substitute
  • Seal off the work area with plastic sheeting in occupied buildings. Isolate
  • Use tools with dust extraction and a vacuum for clean up. Control (engineering)
  • Lightly mist the area with water to keep dust down, away from anything electrical. Control (engineering)
  • Never dry sweep or blow dust off with compressed air. Control (procedures)
  • Provide fire extinguishers suited to the site, checked and easy to reach. Control (engineering)
  • Keep exits and escape routes clear and signed. Control (engineering)
  • Have a site emergency plan: alarm, exits, assembly point and emergency contacts. Control (procedures)
  • Keep a stocked first aid kit and at least one trained first aider on site. Control (procedures)
  • Know the site address and how emergency services get in. Call 999. Control (procedures)
Medium (5)
5Confirm which walls are load bearing and leave them alone without an engineer design
  • Structural collapse during alterations
Workers, OccupantsHigh (10)
  • Get an engineer to check before removing any wall, beam, post or bracing that may be load-bearing. Eliminate
  • Keep everyone clear of the area under and next to the work. Isolate
  • Install temporary props, needles or shoring as designed before removing any support. Control (engineering)
  • Follow the engineer's sequence. Do not change it without approval. Control (procedures)
  • Check props daily. Do not remove them until the permanent support is in and approved. Control (procedures)
  • Wear a hard hat and safety boots. PPE
Medium (5)
6Strip fittings and linings from the top down, using a platform ladder or mobile scaffold for ceilings
  • Falling tools and materials
  • Cuts from sharp edges
  • Falling from a ladder
Workers, Public, People belowHigh (12)
  • Barricade and sign the drop zone under overhead work so nobody walks beneath. Isolate
  • Fit toe boards, kick plates and mesh screens on scaffolds and edges. Control (engineering)
  • Use catch fans, debris netting or covered walkways where people pass below. Control (engineering)
  • Tether hand tools when working at height. Control (engineering)
  • Keep platforms tidy. Do not stack materials near edges or above toe board height. Control (procedures)
  • Deburr or cover sharp edges, and fit edge protectors on exposed sheet metal. Control (engineering)
  • Use knives with retractable or self-retracting blades. Control (engineering)
  • Cut away from your body and keep your other hand clear. Control (procedures)
  • Put used blades in a blade bin or sharps container. Control (procedures)
  • Use two people to handle large sheets of metal or glass. Control (procedures)
  • Use a podium step, mobile tower or MEWP for longer jobs instead of a straight ladder. Reduce / substitute
  • Use EN 131 professional ladders in good condition. Remove any damaged ladder from site. Control (engineering)
  • Set extension ladders at a 4 to 1 angle on firm, level ground, tied or footed, and reaching 1 metre above the landing. Control (engineering)
  • Use ladders only for short, light work (about 30 minutes in one spot). Do not carry heavy or awkward loads up a ladder. Control (procedures)
  • Keep three points of contact and your belt buckle between the stiles. Do not overreach. Control (procedures)
Medium (8)
7Cut or break materials with dust extraction
  • Angle grinder injuries
  • Loud noise
  • Hand-arm and whole-body vibration
  • Silica dust from concrete, brick, stone and tiles
Workers, People nearbyVery high (20)
  • Use a guarded saw or a different tool where you can. Reduce / substitute
  • Keep the guard on and use the side handle. Never remove the guard. Control (engineering)
  • Use the right disc for the job, rated for the grinder's speed. Check it for cracks first. Control (procedures)
  • Only trained people change discs, with the grinder unplugged or the battery out. Control (procedures)
  • Use quieter tools and methods, such as cut-to-size materials, low-noise machines and battery tools. Reduce / substitute
  • Keep noisy plant away from work areas, and use screens or distance between the noise and people. Isolate
  • Keep tools maintained and use mufflers on compressors and generators. Control (engineering)
  • Limit time on noisy tools and rotate workers. Control (procedures)
  • Assess noise. At 85 dB(A) or more, hearing protection is required and the zone must be marked. Control (procedures)
  • Use low-vibration tools and methods, such as a breaker on an excavator instead of a hand jackhammer. Reduce / substitute
  • Keep tools sharp and well maintained, and use anti-vibration handles and seats. Control (engineering)
  • Limit trigger time using the HSE vibration calculator to stay below the exposure action value, and rotate workers. Control (procedures)
  • Keep hands warm and dry, and take regular breaks. Control (procedures)
  • Order materials cut to size, or use low-dust methods such as score and snap or a block splitter. Reduce / substitute
  • Cut outdoors or in a separate area, with other people well away and upwind. Isolate
  • Use water on the blade or on-tool dust extraction connected to an H-class vacuum. Control (engineering)
  • Clean up with a vacuum or wet methods. Never dry sweep or use compressed air. Control (procedures)
  • Do a COSHH assessment and keep exposure below the workplace exposure limit (0.1 mg/m3 respirable crystalline silica, 8 hours). Control (procedures)
  • Workers regularly exposed to silica dust get health surveillance (COSHH reg 11, HSE G404). Control (procedures)
  • Wear a fit-tested FFP3 mask. PPE
Medium (8)
8Watch for needles, droppings and mould in wall and ceiling cavities
  • Needles and sharps
  • Mould and droppings
Workers, OccupantsMedium (9)
  • Use tongs or a pick-up tool. Never pick up needles by hand. Control (engineering)
  • Put needles in a hard sharps container with a lid. Control (engineering)
  • Look before you reach. Use a torch to check ceilings, cavities and rubbish. Control (procedures)
  • If you are stuck, wash the area with soap and water and see a doctor straight away. Control (procedures)
  • Wear puncture-resistant gloves and safety boots. PPE
  • Fix the water leak and dry the area before removing mould. Eliminate
  • Seal off the area with plastic sheeting and keep occupants out. Isolate
  • Clean up with an H-class vacuum and wet wipes. Never dry sweep. Control (engineering)
  • Bag mouldy material on site and remove it promptly. Control (procedures)
  • Wash hands and face before eating and at the end of each shift. Control (procedures)
  • Wear an FFP3 mask, gloves, goggles and disposable coveralls. PPE
Low (4)
9Load waste into the skip by hand or chute, keeping walkways clear
  • Lifting and carrying heavy loads
  • Poor housekeeping and waste
Workers, VisitorsHigh (12)
  • Plan to avoid carrying: have materials delivered, and old items picked up, as close as possible to where they are used. Eliminate
  • Use lighter or smaller loads: order smaller bags and shorter lengths, and drain or break down old items before moving them. Reduce / substitute
  • Use trolleys, pallet jacks, hoists, vacuum lifters or plant instead of carrying by hand. Control (engineering)
  • Use a two-person lift for anything heavy, long or awkward. Plan the route first and clear it. Control (procedures)
  • Keep the load close, back straight and no twisting. Turn with your feet. Control (procedures)
  • Rotate tasks and take breaks on long lifting jobs. Control (procedures)
  • Wear gloves for grip and safety boots to protect your feet. PPE
  • Order materials to size and send packaging back where you can. Eliminate
  • Put skips and waste chutes close to the work. Control (engineering)
  • Clean as you go, and do a full clean up at the end of each day. Control (procedures)
  • Keep exits, stairs and walkways clear at all times. Control (procedures)
  • Stack materials neatly on level ground, away from edges. Control (procedures)
  • Use a registered waste carrier and keep waste transfer notes for at least 2 years. Keep hazardous waste such as asbestos separate, with consignment notes (special waste in Scotland). Control (procedures)
  • Wear gloves when handling waste. PPE
Medium (6)

Method statement: sequence of work

  1. Check the refurbishment and demolition asbestos survey and have any asbestos removed first, by an HSE licensed asbestos contractor where the work is licensable
  2. Check for lead paint and other hazardous materials before work starts
  3. Isolate and cap power, gas and water to the area, and confirm they are dead
  4. Seal the area from occupants, set up dust control and keep exits clear
  5. Confirm which walls are load bearing and leave them alone without an engineer design
  6. Strip fittings and linings from the top down, using a platform ladder or mobile scaffold for ceilings
  7. Cut or break materials with dust extraction
  8. Watch for needles, droppings and mould in wall and ceiling cavities
  9. Load waste into the skip by hand or chute, keeping walkways clear

PPE

Safety bootsSafety helmetSafety glassesFFP3 dust maskCut-resistant glovesEar defendersHalf-mask respirator (P3 filters)CoverallsRigger glovesChemical-resistant glovesSafety gogglesFace shield

Plant and equipment

Hand toolsAngle grinder (disc cutter)BreakerH-class dust extractorTrailer

Emergency

Call 999. Add the nearest A&E, the assembly point and the first aider for your site.

Sign-off

Supervisor and every worker sign to confirm they have read and understood this RAMS.
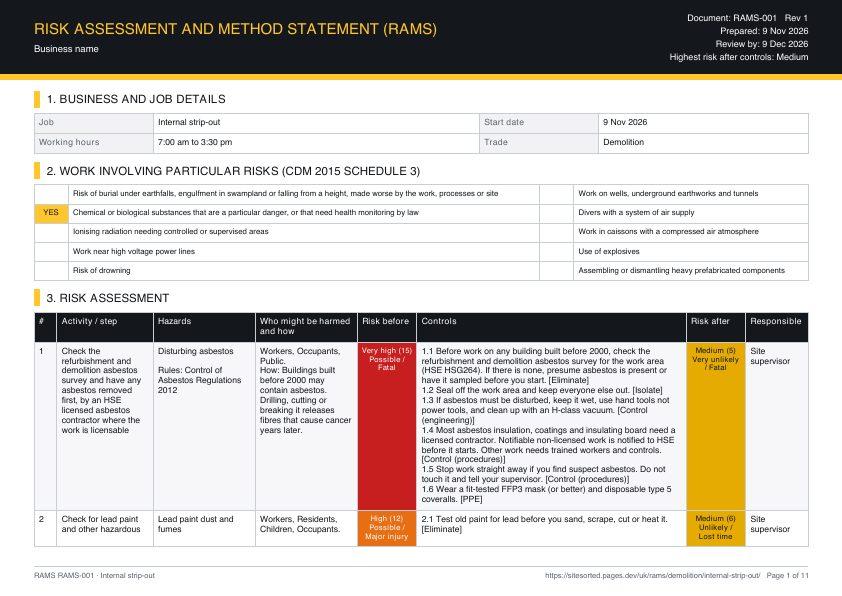
Page 1 of the free soft strip RAMS template: business details, job steps with hazards, risk ratings and controls

Free RAMS template for soft strip

Word (.docx) and PDF, A4 landscape, no email needed. Fill in your site details, then print or send it.

Make yours in 2 minutes

Same document, filled in for your job. Answer a few yes or no questions, the crew signs on the phone, and you send the PDF.

Start this RAMS

Pre-start checklist for soft strip

Tick these off before work starts. They come from the hazards, permits and equipment in this job.

The safe sequence of work

  1. Check the refurbishment and demolition asbestos survey and have any asbestos removed first, by an HSE licensed asbestos contractor where the work is licensable
  2. Check for lead paint and other hazardous materials before work starts
  3. Isolate and cap power, gas and water to the area, and confirm they are dead
  4. Seal the area from occupants, set up dust control and keep exits clear
  5. Confirm which walls are load bearing and leave them alone without an engineer design
  6. Strip fittings and linings from the top down, using a platform ladder or mobile scaffold for ceilings
  7. Cut or break materials with dust extraction
  8. Watch for needles, droppings and mould in wall and ceiling cavities
  9. Load waste into the skip by hand or chute, keeping walkways clear

Hazards to watch on soft strip

The hazards most specific to this job, and the step where each one comes up.

Step 8Needles and sharpsUsed syringes or sharp objects hidden in ceilings, wall cavities, rubbish or soil stab workers and can pass on infection.
Step 8Mould and droppingsWater-damaged buildings, bird and rat droppings and dead animals hold mould and germs that cause breathing problems and infections.
Step 2Lead paint dust and fumesLead paint was common before the 1970s and was used in some buildings until 1992. Sanding, scraping or heating it releases dust or fumes that poison workers and families, especially children.
Step 4Fire and emergenciesA fire, injury or other emergency happens and workers cannot get out, raise the alarm or get first aid in time.
Step 7Angle grinder injuriesThe disc shatters, binds or kicks back, causing deep cuts to legs and hands or eye injuries.
Step 3Gas and fuel linesDamaging or opening a gas or fuel line causes a leak, fire or explosion.
Very likelyLikelyPossibleUnlikelyVery unlikelyHow bad it could be: Negligible to FatalBA
Highest risk on soft strip: Very high before controls (B), down to Medium after controls (A), on the United Kingdom 5 by 5 risk matrix (likely and fatal becomes unlikely and major injury).

What changes on your site

This example covers the job itself. Your site may add more. Add controls for any of these that apply (the builder asks you these as yes or no questions):

  • Will anyone work at height, anywhere a fall could hurt them?
  • Will anyone work on a roof?
  • Is there a fragile roof, skylight or clear roof sheet?
  • Will you use a scaffold or mobile tower?
  • Will you use a MEWP (scissor lift or cherry picker)?

Why RAMS get rejected

Principal contractors send documents back for these reasons. This example avoids them, but check yours too.

  • The method statement is only a list of headings that repeats the risk table and never says how the work is done.
  • The method sequence does not match the risk assessment, for example the method strips the roof before the scaffold is handed over.
  • Residual risk is still High after controls with no extra measures or explanation.
  • It reads as copied: another firm, another address, or wording that does not fit UK sites. HSE warns that copying an example and adding your name does not satisfy the law.
  • Work on an older building with no reference to an asbestos survey.
  • Plant and access equipment listed with no inspection, thorough examination or competence evidence.
  • No briefing record, no revision history, or no named supervisor.

Questions

Do I need RAMS for soft strip?

You must assess the risks of soft strip and record the significant findings if you employ 5 or more people. On CDM sites the principal contractor will ask for RAMS before you start.

Who signs the RAMS?

The person who wrote it and the person who approved it sign and date it. Every worker signs the briefing register after it is explained to them, and the principal contractor reviews and accepts it before you start.

How long do I keep it?

Keep this RAMS, every revision and the signed briefing register with the site file for the length of the job, and keep a copy in your records afterwards.

What PPE is needed for soft strip?

Usually Safety boots, Safety helmet, Safety glasses, FFP3 dust mask, Cut-resistant gloves, Ear defenders, Half-mask respirator (P3 filters), Coveralls, Rigger gloves, Chemical-resistant gloves, Safety goggles, Face shield. The site rules may add more, so check with the principal contractor.

More demolition RAMS

Related jobs in other trades

Toolbox talks for this job

Blank RAMS template: free RAMS templates. Also for other countries: Australia (SWMS) · United States (JHA) · Canada (FLHA)

Sources