SiteSorted
Tiling · Australia

SWMS for wet area waterproofing

A SWMS is required by law if wet area waterproofing includes any high risk construction work, such as working where someone could fall more than 2 metres. Many principal contractors ask for one either way.

It must list the hazards, the controls and how they will be put in place, monitored and reviewed, and the workers must be consulted and sign before starting. The main hazards are silica dust from concrete, brick, stone and tiles, electric shock from leads and power tools, loud noise and flammable liquids and gases.

SWMS example: wet area waterproofing

This is a complete SWMS for wet area waterproofing, with 9 job steps. Open it in the builder to add your site, crew and signatures, change anything, and download a PDF. Or download the free Word template below and fill it in by hand.

Safe Work Method Statement (SWMS)
Wet area waterproofing · Tiling · Example
Document SWMS-001 · Rev 1

High risk construction work covered

None for this task on its own. Tick any that apply on your site.

Job steps, hazards and controls

#Job stepHazardsRisk beforeControlsRisk after
1Check the substrate is sheeted, clean, dry and cured, and keep occupants out of the room
  • Working in an occupied home or building
  • Slips and trips
Medium
  • Plan noisy, dusty or risky work for when the building is empty. Eliminate
  • Close off the work area with barriers, plastic sheeting or locked doors, and put up signs. Isolate
  • Keep fire exits and paths clear at all times. Administrative
  • Tell occupants before you turn off power, water or gas, and before noisy or dusty work. Administrative
  • Lock away tools, chemicals and materials each day, out of reach of children. Administrative
  • Clean up dust and debris at the end of each day. Administrative
  • Plan walkways and keep them clear of materials, hoses and leads. Eliminate
  • Run leads and hoses overhead on hooks or stands, or along walls, not across walkways. Engineering
  • Fill or cover holes, and lay boards or mats on muddy access paths. Engineering
  • Clean up offcuts, packaging and spills as you go, not at the end of the day. Administrative
  • Keep work areas, stairs and access paths well lit. Administrative
  • Wear safety boots with good grip, laced up. PPE
Low
2Read the safety data sheets and set up fans or open windows, as solvent membranes give off fumes
  • Hazardous chemicals
Medium
  • Choose the least harmful product that does the job, for example water-based instead of solvent-based. Substitute
  • Use chemicals in well-ventilated areas, or use fans and extraction in closed rooms. Engineering
  • Hazardous chemicals: see step 7 for the full controls Administrative
Medium
3Have a licensed electrician isolate or make safe power points and lights in the room if they will get wet, and run tools through RCD protection
  • Electric shock from leads and power tools
High
  • Use battery-powered tools where you can. Substitute
  • Plug all tools into an RCD-protected outlet or a portable RCD. Engineering
  • Keep leads off the ground and out of water, using lead stands or hooks. Engineering
  • Check leads, plugs and tools before every use. Tag out and remove anything damaged. Administrative
  • Test and tag leads, tools and RCDs at the intervals in AS/NZS 3012 (every 3 months on construction sites). Push-button test portable RCDs before each use. Administrative
  • Do not use tools in rain or wet areas unless they are rated for it. Administrative
  • Wear safety boots and dry gloves. PPE
Low
4Prepare the surface, grinding with extraction
  • Silica dust from concrete, brick, stone and tiles
  • General dust
  • Loud noise
Extreme
  • If the job involves engineered stone: do not supply, fabricate or install engineered stone benchtops, panels or slabs (banned since 1 July 2024). Removing, repairing or making minor changes to existing engineered stone is only allowed with water suppression or on-tool extraction, a fitted respirator, and written notice to the regulator before the work starts. Eliminate
  • Order materials cut to size, or use low-dust methods such as score and snap or a block splitter. Substitute
  • Cut outdoors or in a separate area, with other people well away and upwind. Isolate
  • Use water on the blade or on-tool dust extraction connected to an H-class vacuum. Engineering
  • Clean up with a vacuum or wet methods. Never dry sweep or use compressed air. Administrative
  • If the cutting, grinding or drilling is high risk, prepare a silica risk control plan (or include the r.529CA assessment in this SWMS), train workers in silica risks and give them the plan before work starts. Administrative
  • Wear a fit-tested P2 (or better) respirator. PPE
  • Use low-dust products, such as dust-reduced or pre-mixed compounds. Substitute
  • Seal off the work area with plastic sheeting in occupied buildings. Isolate
  • Use tools with dust extraction and a vacuum for clean up. Engineering
  • Lightly mist the area with water to keep dust down, away from anything electrical. Engineering
  • Never dry sweep or blow dust off with compressed air. Administrative
  • Use quieter tools and methods, such as cut-to-size materials, low-noise machines and battery tools. Substitute
  • Keep noisy plant away from work areas, and use screens or distance between the noise and people. Isolate
  • Keep tools maintained and use mufflers on compressors and generators. Engineering
  • Limit time on noisy tools and rotate workers. Administrative
  • If you have to shout to be heard 1 metre away, wear hearing protection. Administrative
  • Keep exposure below 85 dB(A) over 8 hours. Give hearing tests to workers who often need hearing protection. Administrative
Medium
5Fit bond breakers, puddle flanges and angles
  • Hazardous chemicals
  • Cuts from sharp edges
Medium
  • Read the Safety Data Sheet (SDS) before use and keep a register of hazardous chemicals on site. Administrative
  • Keep chemicals in labelled containers. Never decant into drink bottles. Administrative
  • Hazardous chemicals: see step 7 for the full controls Administrative
  • Deburr or cover sharp edges, and fit edge protectors on exposed sheet metal. Engineering
  • Use knives with retractable or self-retracting blades. Engineering
  • Cut away from your body and keep your other hand clear. Administrative
  • Put used blades in a blade bin or sharps container. Administrative
  • Use two people to handle large sheets of metal or glass. Administrative
  • Wear cut-resistant gloves and long sleeves. PPE
Medium
6Prime the surface, keeping all ignition sources away until it is dry
  • Flammable liquids and gases
  • Hazardous chemicals
  • Fire and emergencies
High
  • Use non-flammable or water-based products where you can. Substitute
  • Keep ignition sources away: no smoking, no hot work and no running engines near flammables. Isolate
  • Store fuels and solvents in approved, closed containers in a ventilated area away from the work. Engineering
  • Refuel equipment outdoors with the engine off and cool. Administrative
  • Keep only what you need for the day on site. Administrative
  • Store chemicals away from heat, food and drink, and keep products that react with each other apart. Administrative
  • Have eye wash and a spill kit nearby, and wash hands before eating. Administrative
  • Hazardous chemicals: see step 7 for the full controls Administrative
  • Provide fire extinguishers suited to the site, checked and easy to reach. Engineering
  • Keep exits and escape routes clear and signed. Engineering
  • Have a site emergency plan: alarm, exits, assembly point and emergency contacts. Administrative
  • Keep a stocked first aid kit and at least one trained first aider on site. Administrative
  • Know the site address and how emergency services get in. Call 000. Administrative
Medium
7Apply the membrane in coats with nitrile gloves and the respirator the SDS lists (an organic vapour cartridge for solvent or polyurethane products), kneeling on pads
  • Hazardous chemicals
  • Repetitive work and awkward postures
Medium
  • Choose the least harmful product that does the job, for example water-based instead of solvent-based. Substitute
  • Use chemicals in well-ventilated areas, or use fans and extraction in closed rooms. Engineering
  • Read the Safety Data Sheet (SDS) before use and keep a register of hazardous chemicals on site. Administrative
  • Keep chemicals in labelled containers. Never decant into drink bottles. Administrative
  • Store chemicals away from heat, food and drink, and keep products that react with each other apart. Administrative
  • Have eye wash and a spill kit nearby, and wash hands before eating. Administrative
  • Wear chemical-resistant gloves and safety glasses or goggles as listed on the SDS. PPE
  • Use a respirator with the right cartridge if the SDS calls for one. PPE
  • Use tools that cut the effort: powered screwdrivers, long-handled tools and extension poles for overhead work. Substitute
  • Set work up at waist height on benches or trestles where you can. Engineering
  • Use light tools with good grips, and keep blades and bits sharp. Engineering
  • Rotate tasks and take short breaks every hour on repetitive work. Administrative
  • Warm up before heavy physical work and report aches and pains early. Administrative
  • Wear knee pads for kneeling work and gloves for grip. PPE
Medium
8Let it cure, then flood test
  • Slips and trips
Medium
  • Slips and trips: see step 1 for the full controls Administrative
Low
9Clean tools and dispose of waste membrane and tins properly
  • Hazardous chemicals
  • Poor housekeeping and waste
Medium
  • Hazardous chemicals: see step 7 for the full controls Administrative
  • Order materials to size and send packaging back where you can. Eliminate
  • Put skip bins and waste chutes close to the work. Engineering
  • Clean as you go, and do a full clean up at the end of each day. Administrative
  • Keep exits, stairs and walkways clear at all times. Administrative
  • Stack materials neatly on level ground, away from edges. Administrative
  • Wear gloves when handling waste. PPE
Medium

PPE

Chemical-resistant gloves (nitrile)Safety glassesHalf-face respirator (P2 or P3 filters)Knee padsP2 dust maskSteel cap bootsSafety gogglesOverallsWork glovesHearing protection (earmuffs or plugs)Cut-resistant gloves

Plant and equipment

Hand toolsAngle grinderH-class vacuum

Emergency

Call 000. Add the nearest hospital, the assembly point and the first aider for your site.

Sign-off

Supervisor and every worker sign to confirm they have read and understood this SWMS.
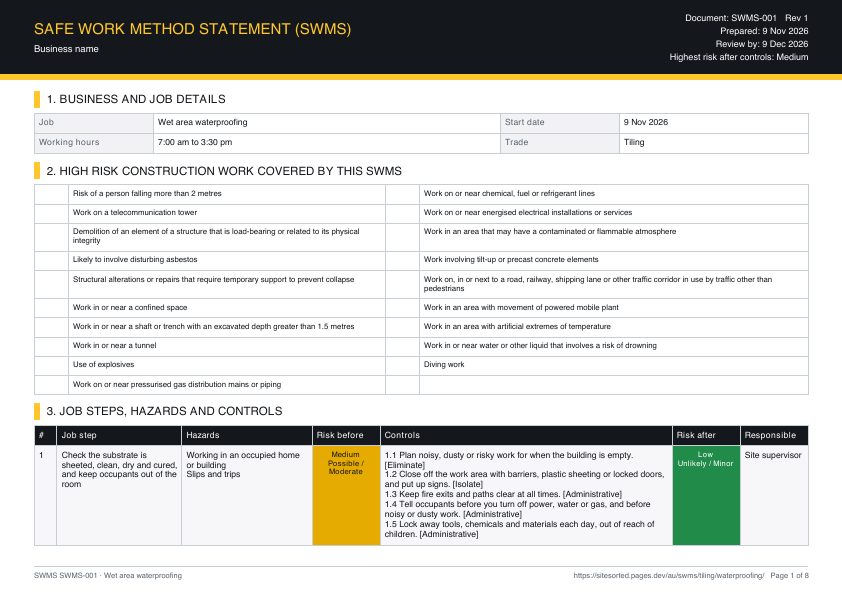
Page 1 of the free wet area waterproofing SWMS template: business details, high risk construction work and job steps with hazards, risk ratings and controls

Free SWMS template for wet area waterproofing

Word (.docx) and PDF, A4 landscape, no email needed. Fill in your site details, then print or send it.

Make yours in 2 minutes

Same document, filled in for your job. Answer a few yes or no questions, the crew signs on the phone, and you send the PDF.

Start this SWMS

Pre-start checklist for wet area waterproofing

Tick these off before work starts. They come from the hazards, permits and equipment in this job.

The safe sequence of work

  1. Check the substrate is sheeted, clean, dry and cured, and keep occupants out of the room
  2. Read the safety data sheets and set up fans or open windows, as solvent membranes give off fumes
  3. Have a licensed electrician isolate or make safe power points and lights in the room if they will get wet, and run tools through RCD protection
  4. Prepare the surface, grinding with extraction
  5. Fit bond breakers, puddle flanges and angles
  6. Prime the surface, keeping all ignition sources away until it is dry
  7. Apply the membrane in coats with nitrile gloves and the respirator the SDS lists (an organic vapour cartridge for solvent or polyurethane products), kneeling on pads
  8. Let it cure, then flood test
  9. Clean tools and dispose of waste membrane and tins properly

Hazards to watch on wet area waterproofing

The hazards most specific to this job, and the step where each one comes up.

Step 6Flammable liquids and gasesPetrol, solvents, thinners and LPG catch fire or explode when vapour reaches a spark, flame or hot surface.
Step 6Fire and emergenciesA fire, injury or other emergency happens and workers cannot get out, raise the alarm or get first aid in time.
Step 3Electric shock from leads and power toolsDamaged leads, plugs or tools, or water near power, give the user an electric shock.
Step 1Working in an occupied home or buildingResidents, staff or children wander into the work area and get hurt, or the work blocks exits or cuts off power or water while people are inside.
Step 4General dustDust from plasterboard, filler, cement and clean up irritates eyes and lungs and makes it hard to see.
Step 7Repetitive work and awkward posturesDoing the same movement for hours, kneeling or working overhead causes long-term damage to joints, muscles and tendons.
Almost certainLikelyPossibleUnlikelyRareHow bad it could be: Insignificant to CatastrophicBA
Highest risk on wet area waterproofing: Extreme before controls (B), down to Medium after controls (A), on the Australia 5 by 5 risk matrix (likely and catastrophic becomes unlikely and moderate).

What changes on your site

This example covers the job itself. Your site may add more. Add controls for any of these that apply (the builder asks you these as yes or no questions):

  • Will anyone work more than 2 metres off the ground?
  • Will anyone use a ladder or stepladder?
  • Will anyone work on a roof?
  • Is there a skylight, clear sheet, fibro or other fragile roofing?
  • Will you use a scaffold or mobile tower?

Why SWMS get rejected

Principal contractors send documents back for these reasons. This example avoids them, but check yours too.

  • It is generic: another site address, tasks that are not on this job, or no sign it was reviewed for this site. WorkSafe WA says a generic SWMS may not meet the regulations unless it is reviewed and amended for the workplace.
  • The HRCW boxes are not ticked, or the ticks do not match the tasks (for example a roof job with no falls box ticked).
  • Falls are controlled only by "be careful", training or a harness, with no edge protection or scaffold and no reason why higher controls are not reasonably practicable.
  • Workers will clip on to a harness but there is no rescue plan for someone left hanging.
  • The "how controls are implemented, monitored and reviewed" part is missing, or it says the same thing on every row.
  • No worker sign-on, no person responsible for compliance, or a date given to the principal contractor that is before they actually received it.
  • Licence or White Card details are missing for workers operating plant or doing licensed high risk work.

Questions

Do I need a SWMS for wet area waterproofing?

A SWMS is required by law if wet area waterproofing includes any high risk construction work, such as working where someone could fall more than 2 metres. Many principal contractors ask for one either way.

Who signs the SWMS?

The person conducting the business (PCBU) or their supervisor prepares it with the workers, and every worker doing the high risk work signs to show they were consulted and understand it. Give a copy to the principal contractor before work starts.

How long do I keep it?

Keep this SWMS, and every revised version, until the high risk construction work is finished, where workers and inspectors can see it on site. If a notifiable incident happens during the work, keep it for at least 2 years after the incident.

What PPE is needed for wet area waterproofing?

Usually Chemical-resistant gloves (nitrile), Safety glasses, Half-face respirator (P2 or P3 filters), Knee pads, P2 dust mask, Steel cap boots, Safety goggles, Overalls, Work gloves, Hearing protection (earmuffs or plugs), Cut-resistant gloves. The site rules may add more, so check with the principal contractor.

More tiling SWMS

Related jobs in other trades

Toolbox talks for this job

Blank SWMS template: free SWMS templates. Also for other countries: United Kingdom (RAMS) · United States (JHA) · Canada (FLHA)

Sources