SiteSorted
Concreting · Australia

SWMS for concrete cutting and core drilling

A SWMS is required by law if concrete cutting and core drilling includes any high risk construction work, such as working where someone could fall more than 2 metres. Many principal contractors ask for one either way.

It must list the hazards, the controls and how they will be put in place, monitored and reviewed, and the workers must be consulted and sign before starting. The main hazards are silica dust from concrete, brick, stone and tiles, electric shock from live wiring, hitting underground services and falling through a floor opening or void.

SWMS example: concrete cutting and core drilling

This is a complete SWMS for concrete cutting and core drilling, with 8 job steps. Open it in the builder to add your site, crew and signatures, change anything, and download a PDF. Or download the free Word template below and fill it in by hand.

Safe Work Method Statement (SWMS)
Concrete cutting and core drilling · Concreting · Example
Document SWMS-001 · Rev 1

High risk construction work covered

None for this task on its own. Tick any that apply on your site.

Job steps, hazards and controls

#Job stepHazardsRisk beforeControlsRisk after
1Get the engineer's approval for every cut, then scan the slab and mark cables, conduits, reo and post-tension tendons. Never cut or core through a tendon
  • Electric shock from live wiring
  • Stored energy
  • Hitting underground services
Extreme
  • Isolate the power before any work. Do not do live work except in the limited cases the WHS Regulations allow (r.157; in Qld, the Electrical Safety Regulation 2013). Eliminate
  • Lock out and tag the isolation point with your own personal lock and danger tag. Isolate
  • Test before you touch: prove dead at the point of work with a voltage tester, proving the tester on a known live source before and after (AS/NZS 4836). Engineering
  • Only licensed electricians do electrical work. Administrative
  • Check for back feeds from solar, batteries and generators that can keep a circuit live after the main switch is off. Administrative
  • Release or block all stored energy before work: release the pressure in pipes, tanks and hoses, bleed hydraulics, release springs, lower loads. Eliminate
  • Lock out and tag all energy sources with personal locks. Isolate
  • Put mechanical blocks or props under raised parts like buckets, tipper bodies and doors. Engineering
  • Test that the system is dead and nothing can move before you start. Administrative
  • Follow the maker's procedure, for example for garage door and roller door springs. Administrative
  • Keep machine buckets well clear of marked services and use a spotter. Isolate
  • Scan the area with a cable locator before digging and mark services on the ground. Engineering
  • Hand dig or vacuum excavate to expose services before using a machine near them. Engineering
  • Lodge a free BYDA (Before You Dig Australia) request and get the plans before any digging. Administrative
  • Keep plans or locate tickets on site and check them again if the work area grows. Administrative
Medium
2Set an exclusion zone, including the floor below for coring, and keep occupants out
  • Falling tools and materials
  • Public entering the work area
  • Working in an occupied home or building
High
  • Barricade and sign the drop zone under overhead work so nobody walks beneath. Isolate
  • Fit toe boards, kick plates and mesh screens on scaffolds and edges. Engineering
  • Use catch fans, debris netting or covered walkways where people pass below. Engineering
  • Tether hand tools when working at height. Engineering
  • Keep platforms tidy. Do not stack materials near edges or above toe board height. Administrative
  • Fence off the site with secure temporary fencing and lock the gates when you leave. Isolate
  • Give pedestrians a safe, marked path around the work, with ramps for prams and wheelchairs. Isolate
  • Use hoarding, covered walkways or catch fans where work is above public areas. Engineering
  • Put signs at each entry: site name, contact number and "No unauthorised entry". Administrative
  • Make the site safe at the end of each day: cover holes, lower plant, remove ladders and lock tools away. Administrative
  • Plan noisy, dusty or risky work for when the building is empty. Eliminate
  • Close off the work area with barriers, plastic sheeting or locked doors, and put up signs. Isolate
  • Keep fire exits and paths clear at all times. Administrative
  • Tell occupants before you turn off power, water or gas, and before noisy or dusty work. Administrative
  • Lock away tools, chemicals and materials each day, out of reach of children. Administrative
Medium
3Plan where the water and slurry will go and keep leads off wet ground, using RCD protection
  • Electric shock from leads and power tools
  • Slips and trips
High
  • Use battery-powered tools where you can. Substitute
  • Plug all tools into an RCD-protected outlet or a portable RCD. Engineering
  • Keep leads off the ground and out of water, using lead stands or hooks. Engineering
  • Check leads, plugs and tools before every use. Tag out and remove anything damaged. Administrative
  • Test and tag leads, tools and RCDs at the intervals in AS/NZS 3012 (every 3 months on construction sites). Push-button test portable RCDs before each use. Administrative
  • Do not use tools in rain or wet areas unless they are rated for it. Administrative
  • Wear safety boots and dry gloves. PPE
  • Plan walkways and keep them clear of materials, hoses and leads. Eliminate
  • Run leads and hoses overhead on hooks or stands, or along walls, not across walkways. Engineering
  • Fill or cover holes, and lay boards or mats on muddy access paths. Engineering
  • Clean up offcuts, packaging and spills as you go, not at the end of the day. Administrative
  • Keep work areas, stairs and access paths well lit. Administrative
  • Wear safety boots with good grip, laced up. PPE
Low
4Check the blade or bit, guard and water feed before starting
  • Saw cuts and kickback
  • Injury from power tools
High
  • Keep blade guards fitted and working, and use the riving knife on table saws. Engineering
  • Use push sticks and clamps, and support long pieces so they do not pinch the blade. Engineering
  • Use a sharp, undamaged blade made for the material. Administrative
  • Stand to one side of the blade line, out of the kickback path. Administrative
  • Let the blade stop fully before reaching in or putting the saw down. Administrative
  • Wear safety glasses, hearing protection and close-fitting clothes. PPE
  • Keep all guards fitted and working. Never tie back or remove a guard. Engineering
  • Clamp or secure the work piece. Do not hold it by hand. Engineering
  • Only trained, competent people use power tools, following the maker's instructions. Administrative
  • Check tools before use. Unplug or remove the battery before changing blades or bits. Administrative
  • No loose clothing, jewellery or long hair near spinning parts. Administrative
  • Wear safety glasses and hearing protection. Do not wear loose gloves on drills or other rotating tools. PPE
Medium
5Fix the core drill rig with an anchor or vacuum base so it cannot spin
  • Injury from power tools
  • Lifting and carrying heavy loads
High
  • Injury from power tools: see step 4 for the full controls Administrative
  • Plan to avoid carrying: have materials delivered, and old items picked up, as close as possible to where they are used. Eliminate
  • Use lighter or smaller loads: order smaller bags and shorter lengths, and drain or break down old items before moving them. Substitute
  • Use trolleys, pallet jacks, hoists, vacuum lifters or plant instead of carrying by hand. Engineering
  • Use a two-person lift for anything heavy, long or awkward. Plan the route first and clear it. Administrative
  • Keep the load close, back straight and no twisting. Turn with your feet. Administrative
  • Rotate tasks and take breaks on long lifting jobs. Administrative
  • Wear gloves for grip and safety boots to protect your feet. PPE
Medium
6Cut with water suppression or extraction, never dry cut. Indoors, use electric or hydraulic saws; never run petrol saws or generators inside (carbon monoxide)
  • Silica dust from concrete, brick, stone and tiles
  • Saw cuts and kickback
  • Loud noise
  • Hand-arm and whole-body vibration
Extreme
  • If the job involves engineered stone: do not supply, fabricate or install engineered stone benchtops, panels or slabs (banned since 1 July 2024). Removing, repairing or making minor changes to existing engineered stone is only allowed with water suppression or on-tool extraction, a fitted respirator, and written notice to the regulator before the work starts. Eliminate
  • Order materials cut to size, or use low-dust methods such as score and snap or a block splitter. Substitute
  • Cut outdoors or in a separate area, with other people well away and upwind. Isolate
  • Use water on the blade or on-tool dust extraction connected to an H-class vacuum. Engineering
  • Clean up with a vacuum or wet methods. Never dry sweep or use compressed air. Administrative
  • If the cutting, grinding or drilling is high risk, prepare a silica risk control plan (or include the r.529CA assessment in this SWMS), train workers in silica risks and give them the plan before work starts. Administrative
  • Saw cuts and kickback: see step 4 for the full controls Administrative
  • Use quieter tools and methods, such as cut-to-size materials, low-noise machines and battery tools. Substitute
  • Keep noisy plant away from work areas, and use screens or distance between the noise and people. Isolate
  • Keep tools maintained and use mufflers on compressors and generators. Engineering
  • Limit time on noisy tools and rotate workers. Administrative
  • Keep exposure below 85 dB(A) over 8 hours. Give hearing tests to workers who often need hearing protection. Administrative
  • Use low-vibration tools and methods, such as a breaker on an excavator instead of a hand jackhammer. Substitute
  • Keep tools sharp and well maintained, and use anti-vibration handles and seats. Engineering
  • Limit trigger time on high-vibration tools and rotate workers. Administrative
  • Keep hands warm and dry, and take regular breaks. Administrative
Medium
7Support cut pieces and cores so they do not drop or pinch the blade
  • Lifting and carrying heavy loads
  • Falling tools and materials
  • Structural collapse during alterations
High
  • Lifting and carrying heavy loads: see step 5 for the full controls Administrative
  • Lower materials with a hoist, chute or rope. Never throw or drop anything down. Administrative
  • Wear a hard hat anywhere objects could fall. PPE
  • Falling tools and materials: see step 2 for the full controls Administrative
  • Get an engineer to check before removing any wall, beam, post or bracing that may be load-bearing. Eliminate
  • Keep everyone clear of the area under and next to the work. Isolate
  • Install temporary props, needles or shoring as designed before removing any support. Engineering
  • Follow the engineer's sequence. Do not change it without approval. Administrative
  • Check props daily. Do not remove them until the permanent support is in and approved. Administrative
  • Install temporary support to the engineer's or temporary works design before any load bearing element is altered. Administrative
Medium
8Cover or guard new holes, vacuum slurry and clean up
  • Falling through a floor opening or void
  • Poor housekeeping and waste
  • Slips and trips
Extreme
  • Cover every hole and penetration with a fixed, secured cover marked "HOLE" or "DANGER". Isolate
  • Put guardrails with toe boards around stairwells, lift shafts, voids and open edges. Isolate
  • Install stairs early and fit temporary handrails as soon as they go in. Engineering
  • Never remove a cover or guardrail without approval. Put it back straight away. Administrative
  • Inspect covers and barriers daily and after other trades have been through. Administrative
  • Order materials to size and send packaging back where you can. Eliminate
  • Put skip bins and waste chutes close to the work. Engineering
  • Clean as you go, and do a full clean up at the end of each day. Administrative
  • Keep exits, stairs and walkways clear at all times. Administrative
  • Stack materials neatly on level ground, away from edges. Administrative
  • Slips and trips: see step 3 for the full controls Administrative
Medium

PPE

Steel cap bootsSafety glassesHearing protection (earmuffs or plugs)P2 dust maskWork glovesHard hatHi-vis shirt or vestHalf-face respirator (P2 or P3 filters)

Plant and equipment

Concrete sawCore drillGeneratorH-class vacuum

Permits and plans

Electrical isolation permit

Emergency

Call 000. Add the nearest hospital, the assembly point and the first aider for your site.

Sign-off

Supervisor and every worker sign to confirm they have read and understood this SWMS.
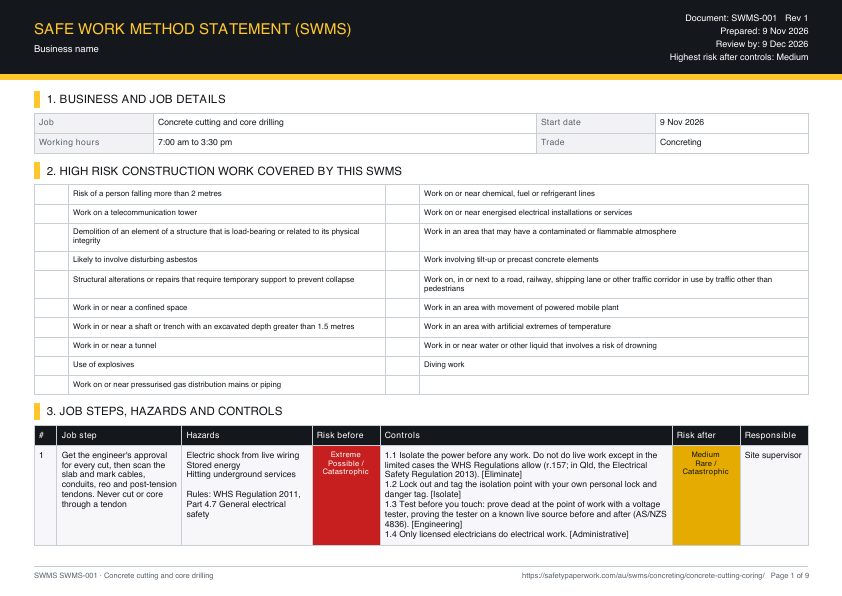
Page 1 of the free concrete cutting and core drilling SWMS template: business details, high risk construction work and job steps with hazards, risk ratings and controls

Free SWMS template for concrete cutting and core drilling

Word (.docx) and PDF, A4 landscape, no email needed. Fill in your site details, then print or send it.

Make yours in 2 minutes

Same document, filled in for your job. Answer a few yes or no questions, the crew signs on the phone, and you send the PDF.

Start this SWMS

Pre-start checklist for concrete cutting and core drilling

Tick these off before work starts. They come from the hazards, permits and equipment in this job.

The safe sequence of work

  1. Get the engineer's approval for every cut, then scan the slab and mark cables, conduits, reo and post-tension tendons. Never cut or core through a tendon
  2. Set an exclusion zone, including the floor below for coring, and keep occupants out
  3. Plan where the water and slurry will go and keep leads off wet ground, using RCD protection
  4. Check the blade or bit, guard and water feed before starting
  5. Fix the core drill rig with an anchor or vacuum base so it cannot spin
  6. Cut with water suppression or extraction, never dry cut. Indoors, use electric or hydraulic saws; never run petrol saws or generators inside (carbon monoxide)
  7. Support cut pieces and cores so they do not drop or pinch the blade
  8. Cover or guard new holes, vacuum slurry and clean up

Hazards to watch on concrete cutting and core drilling

The hazards most specific to this job, and the step where each one comes up.

Step 3Electric shock from leads and power toolsDamaged leads, plugs or tools, or water near power, give the user an electric shock.
Step 1Stored energyEnergy left in springs, hydraulics, compressed gas, raised loads or capacitors releases suddenly and crushes or injures workers.
Step 2Working in an occupied home or buildingResidents, staff or children wander into the work area and get hurt, or the work blocks exits or cuts off power or water while people are inside.
Step 6Hand-arm and whole-body vibrationLong periods on jackhammers, grinders, compactors or riding plant cause white finger, numbness and back damage.
Step 7Structural collapse during alterationsRemoving a wall, beam, post or bracing makes part of the building fall on workers.
Step 1Hitting underground servicesDigging, drilling or driving pegs hits a buried power cable, gas pipe or water main, causing electrocution, explosion or flooding.
Almost certainLikelyPossibleUnlikelyRareHow bad it could be: Insignificant to CatastrophicBA
Highest risk on concrete cutting and core drilling: Extreme before controls (B), down to Medium after controls (A), on the Australia 5 by 5 risk matrix (likely and catastrophic becomes unlikely and major).

What changes on your site

This example covers the job itself. Your site may add more. Add controls for any of these that apply (the builder asks you these as yes or no questions):

  • Will anyone work more than 2 metres off the ground?
  • Will anyone use a ladder or stepladder?
  • Will anyone work on a roof?
  • Is there a skylight, clear sheet, fibro or other fragile roofing?
  • Will you use a scaffold or mobile tower?

Why SWMS get rejected

Principal contractors send documents back for these reasons. This example avoids them, but check yours too.

  • It is generic: another site address, tasks that are not on this job, or no sign it was reviewed for this site. WorkSafe WA says a generic SWMS may not meet the regulations unless it is reviewed and amended for the workplace.
  • The HRCW boxes are not ticked, or the ticks do not match the tasks (for example a roof job with no falls box ticked).
  • Falls are controlled only by "be careful", training or a harness, with no edge protection or scaffold and no reason why higher controls are not reasonably practicable.
  • Workers will clip on to a harness but there is no rescue plan for someone left hanging.
  • The "how controls are implemented, monitored and reviewed" part is missing, or it says the same thing on every row.
  • No worker sign-on, no person responsible for compliance, or a date given to the principal contractor that is before they actually received it.
  • Licence or White Card details are missing for workers operating plant or doing licensed high risk work.

Questions

Do I need a SWMS for concrete cutting and core drilling?

A SWMS is required by law if concrete cutting and core drilling includes any high risk construction work, such as working where someone could fall more than 2 metres. Many principal contractors ask for one either way.

Who signs the SWMS?

The person conducting the business (PCBU) or their supervisor prepares it with the workers, and every worker doing the high risk work signs to show they were consulted and understand it. Give a copy to the principal contractor before work starts.

How long do I keep it?

Keep this SWMS, and every revised version, until the high risk construction work is finished, where workers and inspectors can see it on site. If a notifiable incident happens during the work, keep it for at least 2 years after the incident.

What PPE is needed for concrete cutting and core drilling?

Usually Steel cap boots, Safety glasses, Hearing protection (earmuffs or plugs), P2 dust mask, Work gloves, Hard hat, Hi-vis shirt or vest, Half-face respirator (P2 or P3 filters). The site rules may add more, so check with the principal contractor.

More concreting SWMS

Related jobs in other trades

Toolbox talks for this job

Blank SWMS template: free SWMS templates. Also for other countries: United Kingdom (RAMS) · United States (JHA) · Canada (FLHA)

Sources