SiteSorted
Welding and fabrication · Australia

SWMS for structural steel erection

Yes. Structural steel erection usually includes high risk construction work (risk of a person falling more than 2 metres; work in an area with movement of powered mobile plant), so a SWMS is required by law before work starts.

It must list the hazards, the controls and how they will be put in place, monitored and reviewed, and the workers must be consulted and sign before starting. The main hazards are falling from height, welding and cutting fumes, EWP tip-over or crush and fire from hot works.

SWMS example: structural steel erection

This is a complete SWMS for structural steel erection, with 9 job steps. Open it in the builder to add your site, crew and signatures, change anything, and download a PDF. Or download the free Word template below and fill it in by hand.

Safe Work Method Statement (SWMS)
Structural steel erection · Welding and fabrication · Example
Document SWMS-001 · Rev 1

High risk construction work covered

Risk of a person falling more than 2 metresWork in an area with movement of powered mobile plant

Job steps, hazards and controls

#Job stepHazardsRisk beforeControlsRisk after
1Review the erection sequence and lift plan, and check the crane sits on firm ground
  • Crane and lifting failure
  • Structural collapse during alterations
High
  • Barricade the lift zone and keep everyone out from under the load. Isolate
  • Use a crane rated for the load at the radius, set up on firm ground with outrigger pads. Engineering
  • Check slings, chains, shackles and hooks before use. Remove anything damaged or not tagged. Engineering
  • Plan the lift: weight, radius, ground, path and landing area. Use a written lift plan for complex lifts. Administrative
  • Crane operators and doggers or riggers hold the right High Risk Work Licence. Administrative
  • Use tag lines to control loads and agree on clear radio or hand signals. Administrative
  • Stop lifting in high wind or when the operator cannot see the signaller. Administrative
  • Never ride on a load or hook. Administrative
  • Wear a hard hat, hi-vis, gloves and safety boots. PPE
  • Get an engineer to check before removing any wall, beam, post or bracing that may be load-bearing. Eliminate
  • Keep everyone clear of the area under and next to the work. Isolate
  • Structural collapse during alterations: see step 7 for the full controls Administrative
Medium
2Check for power lines and set the exclusion zone
  • Contact with overhead power lines
  • Public entering the work area
  • Falling tools and materials
High
  • Ask the network operator to turn off, move or insulate the lines before work starts. Eliminate
  • Use non-conductive (fibreglass) ladders near any power lines. Substitute
  • Mark the safe distance with flags, tape or goal posts and keep all plant and people outside it. Isolate
  • Keep out of the No Go Zone set by your state and the network operator, or get written approval and a safety observer. In NSW and Qld, untrained people and plant stay at least 3 m from lines on poles up to 132 kV, 6 m up to 330 kV and 8 m above 330 kV. In Victoria the limits differ, and work within 8 m of tower lines needs a spotter and the network operator's permission. Administrative
  • Use a dedicated spotter whenever plant moves or raises anything near lines. Administrative
  • Treat all lines as live. If plant touches a line, stay in the cab and keep everyone well away. Administrative
  • Fence off the site with secure temporary fencing and lock the gates when you leave. Isolate
  • Give pedestrians a safe, marked path around the work, with ramps for prams and wheelchairs. Isolate
  • Use hoarding, covered walkways or catch fans where work is above public areas. Engineering
  • Put signs at each entry: site name, contact number and "No unauthorised entry". Administrative
  • Make the site safe at the end of each day: cover holes, lower plant, remove ladders and lock tools away. Administrative
  • Barricade and sign the drop zone under overhead work so nobody walks beneath. Isolate
  • Fit toe boards, kick plates and mesh screens on scaffolds and edges. Engineering
  • Falling tools and materials: see step 5 for the full controls Administrative
Medium
3Check holding down bolts and footings are ready before steel arrives
  • Structural collapse during alterations
High
  • Install temporary props, needles or shoring as designed before removing any support. Engineering
  • Follow the engineer's sequence. Do not change it without approval. Administrative
  • Structural collapse during alterations: see step 7 for the full controls Administrative
Medium
4Sling and lift members with a licensed dogger (DG). Placing, connecting and plumbing steel is rigging work that needs at least a Basic Rigging licence (RB)
  • Crane and lifting failure
  • Falling tools and materials
  • Strong wind and storms
High
  • Crane and lifting failure: see step 1 for the full controls Administrative
  • Use catch fans, debris netting or covered walkways where people pass below. Engineering
  • Tether hand tools when working at height. Engineering
  • Falling tools and materials: see step 5 for the full controls Administrative
  • Check the forecast each morning and plan work at height and lifting around the weather. Eliminate
  • Tie down or weigh down loose sheets, panels, boards and rubbish at the end of each shift. Engineering
  • Set wind limits for roof work, platforms and cranes, using the manufacturer's limits, and stop when they are reached. Administrative
  • Stop work and get down in lightning. Wait 30 minutes after the last thunder before going back up. Administrative
  • Check scaffold, fencing and edge protection after strong wind before anyone uses them. Administrative
Medium
5Guide members into place with tag lines, never standing under the load, and line up bolt holes with a podger, never fingers
  • Falling tools and materials
  • Crane and lifting failure
High
  • Barricade and sign the drop zone under overhead work so nobody walks beneath. Isolate
  • Fit toe boards, kick plates and mesh screens on scaffolds and edges. Engineering
  • Use catch fans, debris netting or covered walkways where people pass below. Engineering
  • Tether hand tools when working at height. Engineering
  • Keep platforms tidy. Do not stack materials near edges or above toe board height. Administrative
  • Lower materials with a hoist, chute or rope. Never throw or drop anything down. Administrative
  • Wear a hard hat anywhere objects could fall. PPE
  • Crane and lifting failure: see step 1 for the full controls Administrative
Medium
6Bolt connections from the EWP, clipped on
  • EWP tip-over or crush
  • Falling from height
Extreme
  • Check the ground before setting up. Use outriggers and spreader pads, and keep clear of trenches, pits and slopes. Engineering
  • Use a platform with tilt alarm and secondary guarding (anti-entrapment) where there is an overhead crush risk. Engineering
  • Hold a High Risk Work Licence (WP) for boom-type EWPs with a boom of 11 metres or more. Under 11 metres and scissor lifts: trained and assessed (for example EWPA Yellow Card). Administrative
  • Do a pre-start check each day. Keep a trained person on the ground who can lower the platform in an emergency. Administrative
  • Have a written emergency and rescue plan, tested before work starts, for a worker stuck in the platform or hanging in a harness (WHS Regulations r.80). Administrative
  • Never exceed the safe working load, climb on the rails or use a ladder in the basket. Administrative
  • In boom-type platforms, wear a harness clipped to the basket anchor point. PPE
  • Do the work from the ground where you can, for example pre-assemble on the ground or use extension poles. Eliminate
  • Install guardrails or edge protection on all open edges before work starts. Isolate
  • Use a scaffold, mobile work platform or EWP instead of working off a ladder. Engineering
  • Where edge protection is not practical, use a fall restraint or fall arrest system on a rated anchor point. Engineering
  • Everyone working at height holds a White Card and has been briefed on this SWMS before going up. Administrative
  • Have a written emergency and rescue plan, tested before work starts, so a worker hanging in a harness can be brought down within minutes (WHS Regulations r.80). Administrative
  • Wear a full body harness with a shock-absorbing lanyard, clipped on at all times when using fall arrest. PPE
Medium
7Install temporary bracing or guying to the erection design before releasing the crane from each member, and leave it until the permanent bracing is complete
  • Structural collapse during alterations
  • Strong wind and storms
High
  • Get an engineer to check before removing any wall, beam, post or bracing that may be load-bearing. Eliminate
  • Keep everyone clear of the area under and next to the work. Isolate
  • Install temporary props, needles or shoring as designed before removing any support. Engineering
  • Follow the engineer's sequence. Do not change it without approval. Administrative
  • Check props daily. Do not remove them until the permanent support is in and approved. Administrative
  • Install temporary support to the engineer's or temporary works design before any load bearing element is altered. Administrative
  • Wear a hard hat and safety boots. PPE
  • Do not carry large sheets on roofs in wind. Administrative
  • Wear a hard hat with a chin strap at height in windy conditions. PPE
  • Strong wind and storms: see step 4 for the full controls Administrative
Medium
8Plumb the frame, then tension bolts or weld under a hot work permit
  • Welding and cutting fumes
  • Fire from hot works
  • Eye injuries
Extreme
  • Remove paint, galvanising and coatings from the weld area first, or use a process that makes less fume. Substitute
  • Use fume extraction (local exhaust ventilation) close to the weld. Engineering
  • Weld outdoors or in a well-ventilated area, and keep your head out of the fume plume. Engineering
  • Never weld or cut in a confined space without testing the air and using forced ventilation. Administrative
  • Wear a powered air respirator or fitted respirator when extraction is not enough. PPE
  • Use cold work methods where you can, such as bolting, press fittings or cutting with a saw instead of a torch. Eliminate
  • Move anything that can burn at least 15 metres away (AS 1674.1), or protect it with fire blankets or screens. Isolate
  • Use fire-resistant screens to stop sparks reaching people or gaps in walls and floors. Engineering
  • Get a hot work permit before starting. Administrative
  • Keep a charged fire extinguisher and fire blanket at the work spot. Administrative
  • Use tool guards and screens to stop flying particles. Engineering
  • Use dust extraction and water to keep dust out of the air. Engineering
  • Keep others out of the area when cutting, grinding or chipping. Administrative
  • Keep an eye wash station or eye wash bottles on site. Administrative
  • Wear safety glasses at all times, goggles for dust and chemicals, and a face shield for grinding. PPE
Medium
9Check connections and permanent bracing, then clean up offcuts and bolts
  • Poor housekeeping and waste
  • Falling tools and materials
High
  • Order materials to size and send packaging back where you can. Eliminate
  • Put skip bins and waste chutes close to the work. Engineering
  • Clean as you go, and do a full clean up at the end of each day. Administrative
  • Keep exits, stairs and walkways clear at all times. Administrative
  • Stack materials neatly on level ground, away from edges. Administrative
  • Wear gloves when handling waste. PPE
  • Falling tools and materials: see step 5 for the full controls Administrative
Medium

PPE

Steel cap bootsHard hatHi-vis shirt or vestSafety harness and lanyardWork glovesSafety glassesWelding helmetWelding glovesHalf-face respirator (P2 or P3 filters)OverallsFace shieldSafety goggles

Plant and equipment

Crane (Franna or mobile): HRWL for the crane class (e.g. C2, CN, C6), plus Dogging licence (DG) where slinging needs judgement or the load is out of the operator's viewBoom lift (EWP): HRWL WP for boom-type EWPs with a boom of 11 m or more. Under 11 m: trained and assessed (e.g. EWPA Yellow Card)WelderPower drillHand tools

Permits and plans

Lift planWorking at heights permitHot work permit

Emergency

Call 000. Add the nearest hospital, the assembly point and the first aider for your site.

Sign-off

Supervisor and every worker sign to confirm they have read and understood this SWMS.
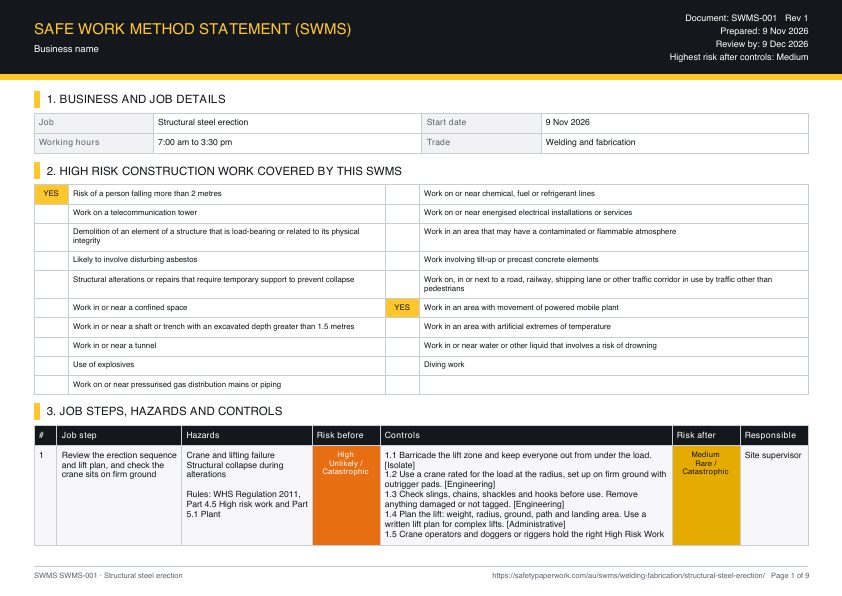
Page 1 of the free structural steel erection SWMS template: business details, high risk construction work and job steps with hazards, risk ratings and controls

Free SWMS template for structural steel erection

Word (.docx) and PDF, A4 landscape, no email needed. Fill in your site details, then print or send it.

Make yours in 2 minutes

Same document, filled in for your job. Answer a few yes or no questions, the crew signs on the phone, and you send the PDF.

Start this SWMS

Pre-start checklist for structural steel erection

Tick these off before work starts. They come from the hazards, permits and equipment in this job.

The safe sequence of work

  1. Review the erection sequence and lift plan, and check the crane sits on firm ground
  2. Check for power lines and set the exclusion zone
  3. Check holding down bolts and footings are ready before steel arrives
  4. Sling and lift members with a licensed dogger (DG). Placing, connecting and plumbing steel is rigging work that needs at least a Basic Rigging licence (RB)
  5. Guide members into place with tag lines, never standing under the load, and line up bolt holes with a podger, never fingers
  6. Bolt connections from the EWP, clipped on
  7. Install temporary bracing or guying to the erection design before releasing the crane from each member, and leave it until the permanent bracing is complete
  8. Plumb the frame, then tension bolts or weld under a hot work permit
  9. Check connections and permanent bracing, then clean up offcuts and bolts

Hazards to watch on structural steel erection

The hazards most specific to this job, and the step where each one comes up.

Step 8Welding and cutting fumesWelding, cutting and brazing give off metal fumes and gases that damage the lungs and can cause cancer.
Step 6EWP tip-over or crushThe platform tips on soft or sloping ground, the worker is crushed against a beam or ceiling, or is thrown out of the basket.
Step 1, 4, 5Crane and lifting failureA load falls or swings, or the crane tips, crushing workers under or near the lift.
Step 2Contact with overhead power linesA ladder, EWP, crane, tipper or long length of material touches or gets close to an overhead line and electrocutes people.
Step 8Fire from hot worksSparks and heat from welding, grinding or flame torches set fire to timber, insulation, rubbish or fuel nearby.
Step 4, 7Strong wind and stormsWind blows sheets, panels and people off roofs and scaffolds, and storms and lightning make work at height and lifting unsafe.
Almost certainLikelyPossibleUnlikelyRareHow bad it could be: Insignificant to CatastrophicBA
Highest risk on structural steel erection: Extreme before controls (B), down to Medium after controls (A), on the Australia 5 by 5 risk matrix (likely and catastrophic becomes unlikely and major).

What changes on your site

This example covers the job itself. Your site may add more. Add controls for any of these that apply (the builder asks you these as yes or no questions):

  • Will anyone use a ladder or stepladder?
  • Will anyone work on a roof?
  • Is there a skylight, clear sheet, fibro or other fragile roofing?
  • Will you use a scaffold or mobile tower?
  • Was the building built before 2004?

Licences and legal requirements in Australia

This task can involve these high risk construction work categories under the WHS Regulations:

  • Risk of a person falling more than 2 metres
  • Work in an area with movement of powered mobile plant

Equipment on this job that needs a licence, ticket or training:

  • Crane (Franna or mobile): HRWL for the crane class (e.g. C2, CN, C6), plus Dogging licence (DG) where slinging needs judgement or the load is out of the operator's view
  • Boom lift (EWP): HRWL WP for boom-type EWPs with a boom of 11 m or more. Under 11 m: trained and assessed (e.g. EWPA Yellow Card)

A SWMS must be prepared before any high risk construction work starts. It must list the high risk work, the hazards and risks, the control measures, and how those controls will be put in place, monitored and reviewed. It must be easy for the workers to read and understand.

Rules that apply: WHS Regulation 2011, Part 4.5 High risk work and Part 5.1 Plant; WHS Regulation 2011, Part 3.2 (falling objects); WHS Regulation 2011, Part 4.5 High risk work; WHS Regulation 2011, Part 4.4 Falls; AS 1674.1 Safety in welding and allied processes (fire precautions).

Each state has its own regulator and some extra rules: New South Wales, Victoria, Queensland, Western Australia, South Australia and Australian Capital Territory.

Why SWMS get rejected

Principal contractors send documents back for these reasons. This example avoids them, but check yours too.

  • It is generic: another site address, tasks that are not on this job, or no sign it was reviewed for this site. WorkSafe WA says a generic SWMS may not meet the regulations unless it is reviewed and amended for the workplace.
  • The HRCW boxes are not ticked, or the ticks do not match the tasks (for example a roof job with no falls box ticked).
  • Falls are controlled only by "be careful", training or a harness, with no edge protection or scaffold and no reason why higher controls are not reasonably practicable.
  • Workers will clip on to a harness but there is no rescue plan for someone left hanging.
  • The "how controls are implemented, monitored and reviewed" part is missing, or it says the same thing on every row.
  • No worker sign-on, no person responsible for compliance, or a date given to the principal contractor that is before they actually received it.
  • Licence or White Card details are missing for workers operating plant or doing licensed high risk work.

Questions

Do I need a SWMS for structural steel erection?

Yes. Structural steel erection usually includes high risk construction work (risk of a person falling more than 2 metres; work in an area with movement of powered mobile plant), so a SWMS is required by law before work starts.

Who signs the SWMS?

The person conducting the business (PCBU) or their supervisor prepares it with the workers, and every worker doing the high risk work signs to show they were consulted and understand it. Give a copy to the principal contractor before work starts.

How long do I keep it?

Keep this SWMS, and every revised version, until the high risk construction work is finished, where workers and inspectors can see it on site. If a notifiable incident happens during the work, keep it for at least 2 years after the incident.

What PPE is needed for structural steel erection?

Usually Steel cap boots, Hard hat, Hi-vis shirt or vest, Safety harness and lanyard, Work gloves, Safety glasses, Welding helmet, Welding gloves, Half-face respirator (P2 or P3 filters), Overalls, Face shield, Safety goggles. The site rules may add more, so check with the principal contractor.

More welding and fabrication SWMS

Related jobs in other trades

Toolbox talks for this job

Blank SWMS template: free SWMS templates. Also for other countries: United Kingdom (RAMS) · United States (JHA) · Canada (FLHA)

Sources